Before Karen Bearse takes you through her fabulously spooky Halloween project, Karen and I would like to thank Karen for all of her fabulous and inspiring work during her time on our Design Team. It has been a true pleasure working with you and we wish you all the best on your future successes! You'll want to make sure to follow Karen on her blog to see what she is up to. Now back to Karen and her spooky Halloween project.
*****************************************************
Karen Bearse here today with my last post for Southern Ridge Trading Co. I have loved being on this team!! I want to thank my team mates especially Katelyn Grosart the DT lead & Karen Beaupre the very generous owner. I will miss these talented ladies but will check in from time to time. I feel the need to focus on other endeavours, but you will still see me around the block!
First I have a creepy Halloween Scrapbook Album for you. I made a similar book way back in 2001 or so. The idea was to do a scrapbook spread every year chronicling our Halloween costumes. This book starts in 1996 with my oldest son’s first Halloween. I have the years up to 2010 where my book kind of stalled out. Time to create part 2 the sequel. The goal is to play with this book and fill in the missing years & carry on from there.
I decided to once again use Eileen Hull’s Journal die but this time in a different way. As most of our Halloween pics tend to be landscape, it will give me room to use bigger photos. First I cut out 2 journal pieces from mat board, lined up & punched the middle hole. Next I cut off the top spine piece leaving me with only 1 row of holes. I used these to add rings so I can add pages as the years go by.
The top pieces were decorated using Distress Oxide, stamped then heat embossed. I have years of Halloween paper hoarded so I brought a bunch out to use on this project. I went with this black & silver spider web paper as the background.
Placing dies & the chipboard piece gave me an idea of how much room I had & where my embellishments should go. I took a photo so I could re-assemble after the pieces were cut & coloured.
Placing dies & the chipboard piece gave me an idea of how much room I had & where my embellishments should go. I took a photo so I could re-assemble after the pieces were cut & coloured.
The cool raven was cut out twice and layered to give him some strength then doodled on. He was adhered with pop dots to give a bit of depth. My ghost was cut out of a piece of white embossed on white paper, misted with Glimmer Mist in Silver for a bit of shimmer.
The cool chippie title was painted using Finnabair art alchemy acrylic paint. Hard to see in photos but in real life there is a great shimmer & metallic finish. Once it was dry the title was a bit dark & did not show up well so I doodled that as well with a white paint pen.
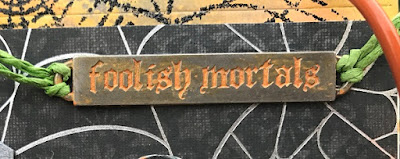
Time for finishing touches! I took my word band and added paint so the letters would show up better, and some hemp. I added orange rings now all I need is to add some pages. I hope you enjoyed my Halloween tutorial & I encourage you to make a book, it is a lot of fun to look back on all the years of Halloween! Thanks again for all the fun playing with Southern Ridge Trading Co.
Southern Ridge Trading Company Supplies Used:
Other Supplies Used:
- Eileen Hull by Sizzix: Journal Die
- Tattered Angels: Tinsel Town (G.Glam) and Silver (G.Mist)
- Tombow: Mono Liquid Glue
- Tim Holtz by Sizzix: Feather & Ravens and Village Graveyard
- Tim Holtz Stamps by Stampers Anonymous
- Tim Holtz Idea-ology by Advantus: Word Band
- Emerald Creek Craft Supplies: Onyx Frost Embossing Powder
- Ranger Ink: Emboss It Dabber
- Finnabair Acrylic Paint by Prima Marketing: Metallic - Dark Forest, Fresh Orange and Silver Spoon, Opal Magic - Pink, Blue and Sparks: Iris Potion
- Karen


No comments:
Post a Comment